Glad you are back for day 11 of the 12 Days of Christmas! Today’s project features the A Walk in the Forest Designer Series Paper and creating custom ribbon. My friend Brenda Nelson over at Stamps and Stretchy Pants and I have had fun sharing so much inspiration with you this month! And she is so talented, I hope you have been hopping over to visit her each day to see what she is sharing!
Stampin’ Up! is featuring the A Walk in the Forest designer series paper as a give-back item to help those in need during the holidays this year. With each pack purchased, Stampin’ Up! will donate $3. And this paper is awesome! You can get a pack now until January 3rd, or while supplies last.
One thing I love about today’s project is the versatility it shows in the designer series paper, which can be playful, whimsical, rustic and even a bit elegant. I pulled in several other items, and love the final result! The Modern Oval Punch provides a great focal point for a sentiment. And the holly from the Sending Cheer Bundle adds a fun touch.
My favorite part of this project though is the custom ribbon. It is made with the Iridescent Ribbon in the September – December 2023 Mini Catalog. However, I colored it using Cherry Cobbler Stampin’ Blends Markers, and the result is amazing! And it’s so easy to do! The ribbon remains iridescent, but with rich color. You could create custom ribbon this way in any color you would like for your project!
Vellum Cardstock pine needles, and Wink of Stella splatters add even more interest, and help pull the details together. The sentiment is from a stamp set called Throughout the Year. I divided the sentiment when I stamped it, so it was more vertical on the punched oval.
To Create this Project:
Cut a 4 1/4″ x 10″ card base, scored at 5 1/2″
Designer Series Paper 4″ x 4 1/4″
Cherry Cobbler Cardstock 4 1/4″ x 3/4″
Very Vanilla Cardstock 4″ x 4 1/4
Color ribbon with Cherry Cobbler Stampin’ Blends, then cut in half lengthwise. Tie a bow with one of the strips. Adhere designer series paper to card front. Splatter with Wink of Stella. Die cut Cherry Cobbler strip with border die and adhere strip to bottom of card front. Adhere unused piece of colored ribbon across top of border strip. Trim. Punch a Very Vanilla modern oval. Add sentiment in Cherry Cobbler ink, then adhere oval to card front with dimensionals. Stamp berries in Cherry Cobbler ink on Cherry Cobbler cardstock and holly leaves in Pretty Peacock ink on Pretty Peacock cardstock. Die cut berries and holly. Die cut two pine boughs from Vellum. Layer holly, berries, and pine boughs on card front, then adhere in place. Adhere bow to sentiment label. Adhere Vanilla layer inside card. Stamp sentiment as desired inside card in Cherry Cobbler ink.
Thank You
Thanks for stopping by today to see this project made with the A Walk in the Forest designer series paper and to see how to create custom colored ribbon! I hope you having fun hopping with us! Head on over to see what Brenda has to share today!
Welcome back for day 10 of the 12 Days of Christmas. Today I am sharing this pinch bag made with the Beary Christmas suite. It is perfect for gifting a small treat or gift. If you have been following my friend Brenda Nelson Stamps and Stretchy Pants and I, we have been having fun sharing holiday inspiration with you each day,
I apologize for the gap in sharing. Parts of my blog functionality were down, and I was unable to create posts! But we are back on track now for the last 3 days.
This little bag is so adorable, and really easy to make. It’s a great way to showcase designer series paper, but you could also make it with cardstock.
For this bag, I brought in the adorable polar bears from the Beary Christmas Suite. And do you see the ‘snow’? This is the Pearlized Enamel Effects in white. It worked great!
To create this project:
Score a 12″ x 6″ piece of designer series paper at 1 3/4″ on the short edge, and 1-1/2″, 4-1/4″, 7-1/4″ and 10″ on the long edge. Make note of pattern direction before scoring. Burnish all the score lines well. Trim along vertical score lines from the bottom edge up to the horizontal score. Fold bag and adhere overlapping ends. Fold bottom flaps in and adhere in place. Squeeze the sides in and pinch so top folds closed. Create a tab for the top with a 3/4″ x 3″ scrap folded in half. Staple in place to hold bag closed once filled. Tie a white twine bow around tab. Place a Night of Navy decorative circle punch on the front. Stamp tree in Mossy Meadow ink and fussy. Adhere to circle. Embelish with a star or gem on the top. Stamp polar bear in Balmy Blue ink. Add a scarf in Sweet Sorbet, then punch and adhere with dimensionals. Stamp (2) presents. Fussy cut and adhere. Stamp sentiment in Sweet Sorbet ink, trim, and adhere to bag.
Thank You
Thanks for stopping by today for another cute project made with the Beary Christmas suite. Not hop on over to see what Brenda has to share, I know it will be another great one!
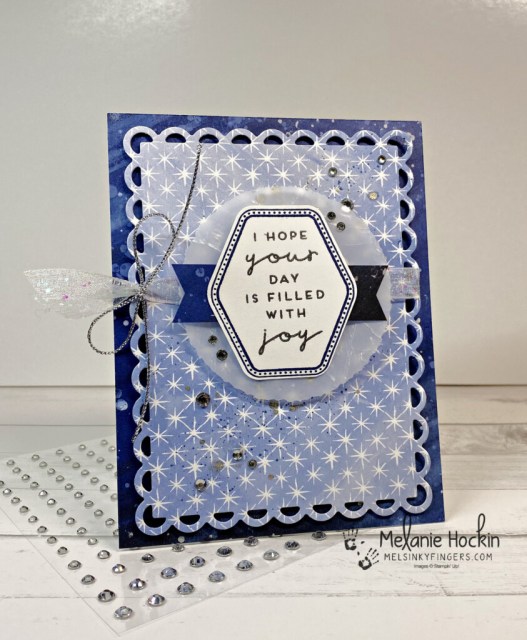
Thanks for stopping back for day 9 of the 12 Days of Christmas! Today I am sharing a card with the Heartfelt Hexagon stamp and punch bundle.
Now, the Heartfelt Hexagon Bundle isn’t really a Christmas bundle, but I wanted to show you how you can use so many items you have on hand, and make them into something you may not clearly see.
Often times, you can use the stamps and supplies you have for so many occasions. I chose an all-occasion stamp set and paired it with some new designer series paper to create a Christmas card. I didn’t even go with a traditional color palette. But what I love about this, is you could use it for so many different occasions, and it would be perfect!
The O Holy Night Designer Series Paper is gorgeous. I love the blues and patterns on one side, and the great early tones and patterns on the other. I went with the blues for this card, and paired it with silver, shimmer, and bling to dress it up.
To create this card:
Thick Basic White card base 8 1/2″ x 5 1/2″, scored at 4 1/4″
Designer Series Paper 4 1/4″ x 5 1/2″ and 4″ x 5 1/4″ to die cut largest rectangle
Vellum Cardstock 3 1/4″ x 3 1/4″ to die cut 2 7/8″ circle
Adhere larger piece of designer series paper to card front. Wrap ribbon around die cut rectangle and tie ends together with silver cord bow. Adhere to card front with dimensionals. Splatter card front with Wink of Stella and Night of Navy Marker. Let dry. Emboss circle with embossing folder. Adhere to card front with dimensionals. Stamp frame in Night of Navy ink. Stamp sentiment in Versamark ink inside frame. Emboss sentiment with silver embossing powder. Punch. Adhere a scrap strip of designer series paper to sentiment piece. Trim ends, and adhere to card front. Embellish with rhinestones.
Thank You
Thanks for stopping by for day 9 of the 12 Days of Christmas, where I shared a card made with the Heartfelt Hexagon bundle. I hope it inspires you to look at your stamps in a different way! Now be sure to visit Brenda over at Stamps & Stretchy Pants. I have loved every one of her projects so far! How about you?
The content in this blog is the sole responsibility of Melanie Hockin as a Stampin' Up!® Independent Demonstrator. The use of and content of classes, services or products offered is not endorsed by Stampin' Up!