So….sympathy was not the first thing that popped into my mind when I saw this stamp set, but I find this sentiment perfect for expressing our feelings for a special loved one.
I needed a special sympathy card this week, and I pulled this sentiment from the Forever Lovely stamp set, along with the beautiful coordinating die set, Lovely Flowers. These dies are amazing! The edgelit die used on this card creates the most gorgeous detailed edge, and it has a coordinating stamp, which brings it to a whole new level. And lining it up is as easy as ever using the stamparatus, more about that below.
The Pinewood Planks embossing folder used on the front layer adds a little masculine flair.
To recreate this card:
Cut a 4 1/4" x 11" Thick Very Vanilla card base, and score at 5 1/2"
Cut a 3 3/4" x 5" piece of Very Vanilla card stock for the front layer and a 1" x 3 3/4" piece for the sentiment
Emboss the front layer with the Pinewood Planks embossing folder before die cutting the edge with the large floral edgelit die from the Lovely Flowers die set.
Stamp the flowers in Daffodil Delight ink and the leaves and sentiment in Soft Sea Foam ink.
I used my Stamparatus to get perfect alignment of the stamp to the die cut detail. I die cut the edge of the front layer first, than used the stamparatus to line up the stamp. All the tips are in my video!
This bundle works well throughout the year for so many occasions….birthday, sympathy, wedding, anniversary, and even a thinking of you card. Pick up this beautiful bundle from my store today!
The September Paper Pumpkin consistently is my favorite each year. I think it's the fall colors. I am just ready for them…..and sweatshirt weather…..by the end of August. This month's kit is extra cool because it makes cards -AND- gift/treat containers. BONUS!
And the project comes together quite quickly. The embossing on the box is so pretty, and a perfect touch!
Paper Pumpkin offers a great project, without the planning. It is portable to craft on the fly, or perfect to create while you watch TV, the choice is yours! Everything you need to complete the project, in a little orange box!
Plus, there's somethin' special coming, too! The October and November kits are a two part kit! Let Stampin' Up! get you ready for the holidays. Here is a peek!
Doesn't that look fun? Look forward to receiving your orange box. Subscribe now! Subscribe by the 10th of each month to receive that month's kit.
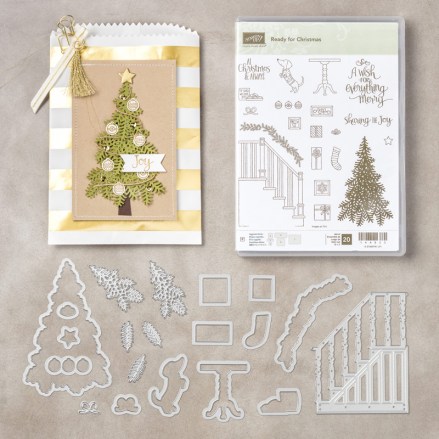
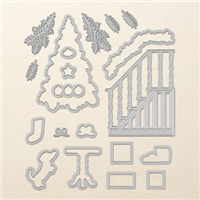
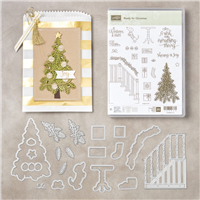
The first time I saw the Ready for Christmas stamp set, I saw the garland stamp as a hairy spider leg. Please don't ask why. I don't know why. But I ordered this bundle because I had to make today's card!
It came out just as I envisioned! That is not always the case! Often those crazy visions turn into epic fails. But I love how he turned out! And now that I have that hairy spider leg out of my mind, I can move forward, and create some Christmas cards with this bundle, because it is amazing!!
Tips to Recreate this Card:
the Pumpkin Pie card base is cut 5 1/5" x 8 1/2" and scored at 4 1/4"
the background is Spooky Night designer series paper cut 5" x 3 3/4", on a layer of 5 1/8" x 3 7/8" Basic Black cardstock.
For the spider, I stamped in VersaMark ink and heat embossed with clear embossing powder so he had texture, and stood out better on the basic black cardstock.
To make the Legs:
stamp and heat emboss 4 pieces of garland, than die cut using the coordinating Christmas Staircase die set
embossed 4 more legs using the mirror-image stamping technique, and die cut those as well (the die does not cut mirror images, so line up as best you can)
To make the Body:
stamp and heat emboss the large christmas tree
using the Starburst punch, punch one piece
glue him all together using glue dots and mini dimensionals to make him look 3-D
using the size of your choice, add 2 googlie eyes
What do you think? Can you make a fall or Halloween card using this bundle?
The content in this blog is the sole responsibility of Melanie Hockin as a Stampin' Up!® Independent Demonstrator. The use of and content of classes, services or products offered is not endorsed by Stampin' Up!


